Designing a calculator application is almost every programmers wish to be able to see your own version in java working without crashing. Lets see how it is done with using the mouse clicks only. Adding the keyboard actions is more involved. But this version is sufficient to achieve the goal of a working calculator application. We will look at the java development environment all the needed IDE’s. Then, how the whole java project is structured in Eclipse IDE. We will also look at the methods or functions that enable the application to work properly. Then, finally the completed code and the java project can be eventually downloaded. Let’s go!
Java development environment
It is always a good idea to have your java development environment setup in a working order. The IDE I will be using is Eclipse for java which is a free java IDE which can be downloaded at https://eclipseide.org/ . Now also need another IDE called GuiGenie which can be downloaded at http://www.guigenie.cjb.net/. Once, these two IDE’s are installed in your java enabled computer we are ready to go!
Java IDE for user interface object
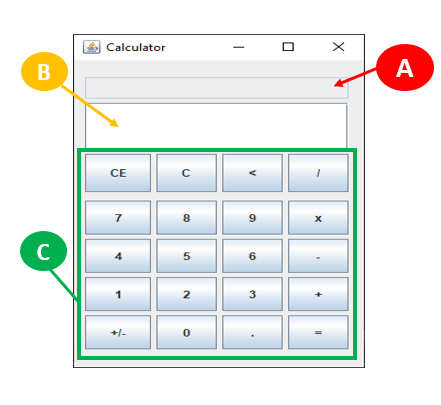
Let us say your java environment works fine. This means your java runtime environment works (JRE) and java development kit (SDK) is installed which can be any version from 1.8 upwards. If there are any issues of java not working on your PC post a question the comments section below. Now, when using your IDE for graphic use interface (GUI) try to layout your GUI as below (FIGURE 1).
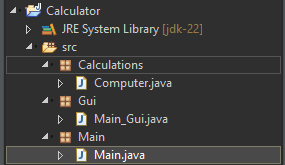
This GUI IDE is a dropdown type. So, the Buttons and Textfields are just dropped on the application windows. Just to get a view of how the Java project is structured in terms of packages and classes. The structure is as below (figure). So, in your eclipse IDE create a Calculator project with packages and classes seen in FIGURE 2.
The classes involved and their source code
Logically, let us start with our main class that executes the Calculator application.
Main.java
package Main;
import java.awt.BorderLayout;
import javax.swing.JFrame;
import Gui.Main_Gui;
public class Main
{
public Main()
{
JFrame frame = new JFrame ("Calculator");
frame.setDefaultCloseOperation (JFrame.EXIT_ON_CLOSE);
frame.add(new Main_Gui(), BorderLayout.CENTER); //ADD MAIN GUI
frame.setSize(280,400);
frame.setLocation(500,100);
frame.setVisible (true);
}
public static void main(String[] args)
{
Main now = new Main(); // CALL MAIN CONSTRUCTOR
}
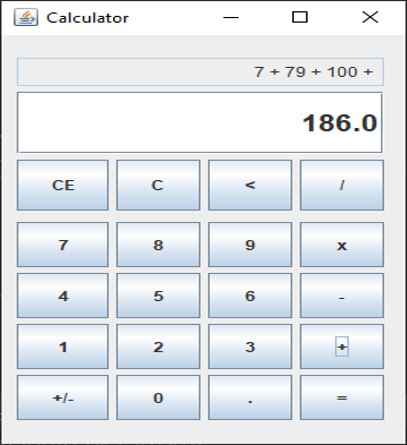
}As seen the code call “Main_GUI.class” , this is the class that will display the Calculator GUI like seen in figure?. In this class what is important are the object references, which enables the functioning of the code. Example, ”jnumber” JTextField referrers to the main answer (as seen in figure 1) this is the “B” field. Now , this class has three main part:
“1. Main gui elements” code can be viewed here.
“2. Handling Button events”, view code here.
“3. All functions/method to do calculations” code can be viewed here.
Lastly, the Compute.class provides the addition, subtraction, division and multiplication.
How the calculator works
As the user clicking on the number to start a calculation. The “jnumber JTextField” needs to be appended to show the complete number. Here function “updateFinalNumber(String txt)” together with button handling events “actionPerformed(ActionEvent e)” achieve this. If any operator (+,-,*,/) can be pressed to do an addition example. But before that happens, the number must be cleared for the next number to be typed. In this case, the button (+,-,*,/) show clear the number first by calling “clearNumber()”. Then, first number is saved and the added to send number by using functions “setSecondNumber(String num)”. Then calculation is done by calling “doCalcution(String operator,String second_num)”. Notice the operator(+,-,*,/) is also saved temporarily using “setOperator(String op)”.
The complete code
The Eclipse project can be download here . Otherwise, in your own Java IDE the above code segments can be copied and put together and the application should work when run. The other method not explained I am sure you can figure out the tricks applied. If all goes well you should be to see all the calculation steps on the “A” field and the answer on the “B” Filed as seen below.